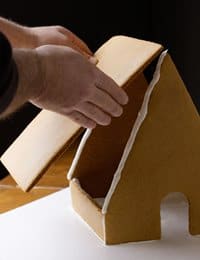
It’s the time of year when gingerbread houses start dotting the landscape. We admit it: we’re a big part of the problem. Our students just love to flex their baking muscles! Watch the video and see if you recognize whose “house” they created. Then, use our recipe and templates to build and decorate a simple gingerbread house. From there, let your imagination run wild and create your own templates for a gingerbread castle, hotel, or…). Happy holidays!
Gingerbread House Recipe

Makes 1 gingerbread house*
Flourless cooking spray
3 1/4 cups all-purpose flour, plus extra for dusting
2 teaspoons baking soda
1 1/2 teaspoons ground ginger
1 1/2 teaspoons ground allspice
1 teaspoon kosher salt
8 tablespoons (1 stick) unsalted butter, at room temperature
3/4 cup tightly packed dark brown sugar
1/2 cup honey
2 large eggs
Royal Icing, as needed (recipe follows)
Preheat the oven to 375 degrees F. Lightly spray cookie sheets with cooking spray or line them with parchment paper. Sift together the flour, baking soda, ginger, allspice, and salt and set aside.
In a stand mixer fitted with the paddle attachment, cream together the butter, brown sugar, and honey on medium speed, scraping the sides of the bowl occasionally, until smooth, about 2 minutes. Add the eggs and mix until smooth and light, another 2 to 3 minutes. Add the sifted dry ingredients and mix on low speed just until the dough is evenly mixed. Form the dough into a disk and wrap in plastic wrap. Refrigerate for at least 1 hour or up to overnight.
Create the templates and attach them to some rigid cardboard. Use a utility knife or scissors to cut them out. These can be placed on the dough and used as a guide to cut out the shapes for your pieces. If you’ve made extra dough, you can also create architectural details of your choice, such as chimneys or shutters, or decorative details like sleighs or reindeer.
Roll out a portion of the dough into a rectangle about 1/4-inch thick, reserving the remainder in the refrigerator. Roll the dough as evenly as possible. Cut out the pieces necessary and collect all the scraps. You will need them to roll out to cut more pieces.
Working in batches, as needed, transfer the pieces to the prepared baking sheets and bake until golden around the edges, 12 to 14 minutes. Remove them from the oven immediately, trim the pieces if they have spread in the oven, and place the pan on a cooling rack. After 10 minutes, run a spatula under the pieces to free them from the baking sheets. Allow the pieces to finish cooling completely on the baking sheets.
Cut a piece of corrugated cardboard to build you house on. Cover it with heavy-duty aluminum foil.
To assemble the sides, pipe a bead of royal icing along the edges. Pipe more icing along the inside seam where the pieces meet, to reinforce the joint. Allow the four walls to dry completely for several hours or overnight before applying the roof.

Pipe a bead along the seam of the joint for one side of the roof. Put the roof panel in place and use a prop to keep the roof panel from sliding down until the icing has completely hardened. Again, pipe more icing along the inside seam where the pieces meet, to reinforce the joint. Let the first roof panel dry in place for at least an hour, then repeat the process with the second half of the roof.
*Chef’s note: This recipe makes just enough dough for one gingerbread house. You may choose to make an additional half or full batch of dough to account for breakage or to make additional decorative pieces.
Royal Icing Recipe
Makes about 1 cup
2 large egg whites
1/8 tsp cream of tartar
2 1/2 cups confectioners’ sugar, sifted
Liquid or paste food coloring(s), as needed (optional)
In the clean, grease-free bowl of a stand mixer fitted with the whisk attachment, beat the egg whites on low speed just until they become loose, about 1 minute. Add the cream of tartar and continue mixing on low speed until the whites become frothy, 2 minutes. Add the confectioners’ sugar gradually with the mixer on low speed.

Continue to mix until the icing holds a soft peak and is dull in appearance, about 2 minutes. The icing is ready to use for piping lines. Or, add a small amount of water until the icing reaches a looser consistency for flooding, or filling in, an outline. If desired, divide the icing among smaller bowls and add coloring(s).
Some notes about using royal icing:
- Working quickly is very important as royal icing dries very fast once it has been piped.
- To keep royal icing from hardening while you are working with it, store the icing in a sealed container with a damp paper towel directly on its surface.
- If you don’t have a pastry bag available, simply use a heavy-duty resealable plastic bag with one small corner cut off for the piping tip to decorate your gingerbread house.
- Clean the sides of the bowl or container to remove any drips; if a dry crust develops on the bowl, small pieces can drop into the icing and clog the tip of your pastry bag.
- If the icing seems too thick, it can be thinned with a tablespoon of water.
- It is best not to rush the process; allow plenty of time between assembly steps so the royal icing can properly dry.
- Any leftover icing should be thrown out (as it contains raw egg white) and not saved for later use. You may prefer to use pasteurized egg whites in this recipe to eliminate any food safety concerns.
